How Do I Edit Gravity Forms in WordPress?
Editing a form is super simple; when you go to your forms area, you can just click underneath the form you want to edit, and you will be presented with a form page with both simple and advanced edits.
- Log in to wp-admin with user name and password.
- In the dashboard, click on “Forms”.
- Click the “Edit” link on the form you want to edit.
- If you have added the name field to your form you can select to have area for first and last name.
- Under “Rules” you can select “required” if you want that field to be required on the form.
- Single line text – add this field if you want additional information such as what company they are from. Click to add the name in Field Label.
- Click “Appearance” to change the Field Size (small, medium, or large).
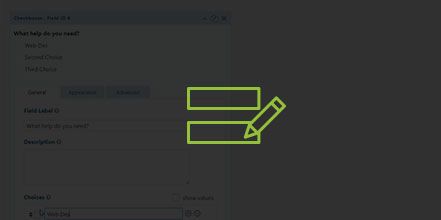
- Add a checkbox with a title and enter Choices for the user to select from. (Ex: What help do you need? Web Design, App Development, SEO Marketing)
- You can add Paragraph Text for a large box where user can enter additional information such as Comments.
- Dropdown field is just a basic field where you can add some dropdown choices.
- Radio Buttons are similar to checkboxes but the user will only be able to select one option from Choices instead of multiple choices.
- Date Field 0 You can select the Date Picker under Date Input Type to add a Calendar or Custom Icon. Add a date format.
- Address Field – you can choose which options you want to show (Street Address, Address Line 2, City, State/Province, Zip/Postal Code)
- File Upload – this field allows the user to upload file images. Add the allowed file extensions (Ex: jpg, gif, png, pdf), enable Multi-File Upload, Maximum File Size and if you want the field required.
- Captcha – there are steps in here to set this up (you will need to sign up for an API key and enter secret keys in settings)
- You can select the Post Field to add categories (this section is techier).
- Pricing Field – if you have a form where you are going to be selling something or asking for payment. The fields include Product, Quantity, Option, Shipping and Total (The total field will add up all of the options they selected in the form).
- Under Form Settings, you can add the form title, description, label placement (top, left or right aligned), sub-label placement (below or above inputs), form button, save and continue, restrictions, and form options (Anti-Spam Honeypot – this places a hidden field that when bots go through it will fill in the hidden field not allowing the form to be submitted)
- Click “Update Form Settings” to update the form.
YouTube Video: https://www.youtube.com/watch?v=GLnDr4HiXqk&feature=youtu.be