How Do I Use the Contact Form 7 Plugin for WordPress?
The Contact Form 7 plugin is a very basic, straightforward program that allows for easily editable contact forms. Once installed, it allows you to customize and optimize forms that are entirely relevant to the specific goals and functions of your website.
Not only does this plugin make your life easier, it is a great way to make contact forms relevant to users; in other words, there aren’t fields, questions, or required information that does not pertain to the task at hand.
Additionally, the Contact Form 7 plugin allows you to redirect customers to new pages after they submit their contact form. For example, if you want them to see a certain page, or if you would like to direct them to a “thank you for submitting!” message, this plugin allows you to customize the way you see fit.
This plugin is a great way to help you improve the functionality of your website, as well as your digital marketing as a whole.
- Log in to your wp-admin with user name and password.
- In the dashboard, click on “Plugins”.
- Scroll down the list to see if “Contact Form 7” is installed. If it is not installed follow these steps:
a. At the top, click “Add New”.
b. In the search at the right, type Contact Form 7.
c. Click “Install Now” and activate. - In the dashboard, click on “Contact”.
- Click “Add New”.
- If it asks you if you want to use the default language (English), then click “Add New”.
- It will bring up a basic contact form with Name, Email, Subject, and Your Message.
- Add a title to your contact form.
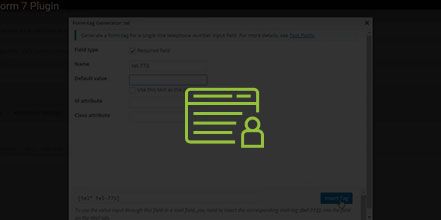
- To add a phone number, enter a little space under the area you want to add the telephone field and click on “tel”.
- Field type – click “Required Field” if you want that field to be required when filling out the form. (NOTE: You don’t need to change the Name field in there.)
- Default value – you can use this as a placeholder for the field.
- Click “Insert Tag”. (You will now see that it placed a basic shortcode in there.)
- To add a label above the field for phone, copy the Your Name title code
Your Name (required)
and paste it above the phone number shortcode. Change the title from “Your Name” to “Your Phone”.
- Make sure to place an ending paragraph tag after the phone number shortcode [tel’ tel.773]
- Click “file” to add an area where files can be upload.
- You can add checkboxes for certain services that a person can check off to let you know what they are interested in.
- Recaptcha – Once this is set up the person filling out the form will be required to click a button to prevent spam from coming into your email. If you just have basic fields set up without this, then bots will automatically enter information into the fields and click send button without a person having to do this so you can get a lot of spam. With Recaptcha, they will have to enter a code or click a box that says that they are a real person.
- Click on the mail tag, and enter the email that you want your message sent to.
- In mail, enter [your-name] and [your-email] in the From section.
- In mail, enter a subject line (Ex: Contact Form Submission from Website.) or you could enter [your-subject] so whatever the person puts in to the subject will show.
- In mail, message body is where you can fill out any additional information (ex: phone number shortcode [tel.773], [checkboxes], etc…) and it will put whatever that person enters into the field.
- In mail, you can also enter Mail (2) to add an additional email
YouTube Video: https://www.youtube.com/watch?v=HLMEgshE9Dw&feature=youtu.be